Guides
How I Shot a 1-Year Construction Time-Lapse for Under $500 (Instead of $15,000+)
Professional time-lapse services like EarthCam and BuildCam quoted us five figures. A $200 Reolink camera on a $6/month Reolink SIM plan delivered a clean 4K time-lapse of our entire 12-month build.
When we broke ground on a commercial build last year, the GC wanted a time-lapse of the full project. The kind you see on LinkedIn - 60 seconds of a building rising from dirt to done. Great for marketing, great for stakeholder updates, great for the portfolio.
Then I got the quotes.
What the professionals wanted to charge
I reached out to two of the big names in construction time-lapse: EarthCam and BuildCam. Both offer turnkey solutions - ruggedized cameras, cellular connectivity, cloud hosting, and a polished final video.
Both also charge accordingly:
| Provider | Quote |
|---|---|
| EarthCam | $6,000–$15,000 |
| BuildCam | $7,500–$9,000 |
These are the actual quotes I received - your numbers will vary depending on resolution, number of cameras, and whether you want their team to produce the final edit. But the point stands: professional construction time-lapse is a four-to-five-figure line item.
For a large commercial developer, that's a rounding error. For us, it was the entire marketing budget.
The DIY alternative that actually worked
I'd been using Reolink cameras for site security on previous projects. One detail caught my eye: the Reolink Go Ultra has a built-in time-lapse mode buried in its settings. It's a 4K cellular camera with solar power - meaning no WiFi required, no power runs, no electrician. You mount it, point it, and forget it.
So I bought one to test.
Total cost breakdown
| Item | Cost |
|---|---|
| Reolink Go Ultra + Solar Panel 2 | ~$200 |
| Reolink SIM card | Included with camera |
| Reolink cellular plan (12 months, 1GB/mo) | ~$72 ($6/mo) |
| 128GB microSD card | ~$15 |
| Fence mounting hardware + zip ties | ~$15 |
| Total | ~$302 |
Compare that to the $6,000–$15,000 EarthCam quote. Same result. Same 12 months. Roughly $300 all-in.
How I set it up
The whole install took about 30 minutes. No electrician, no IT support, no vendor coordination.
1. Mounting
I mounted the camera to the perimeter fence facing the construction site. Zip ties and the included mounting hardware were all it took - solid enough to hold for a year, easy to reposition if needed. The solar panel went on the same fence section, angled south. The included cable between the panel and camera is long enough to position them independently.
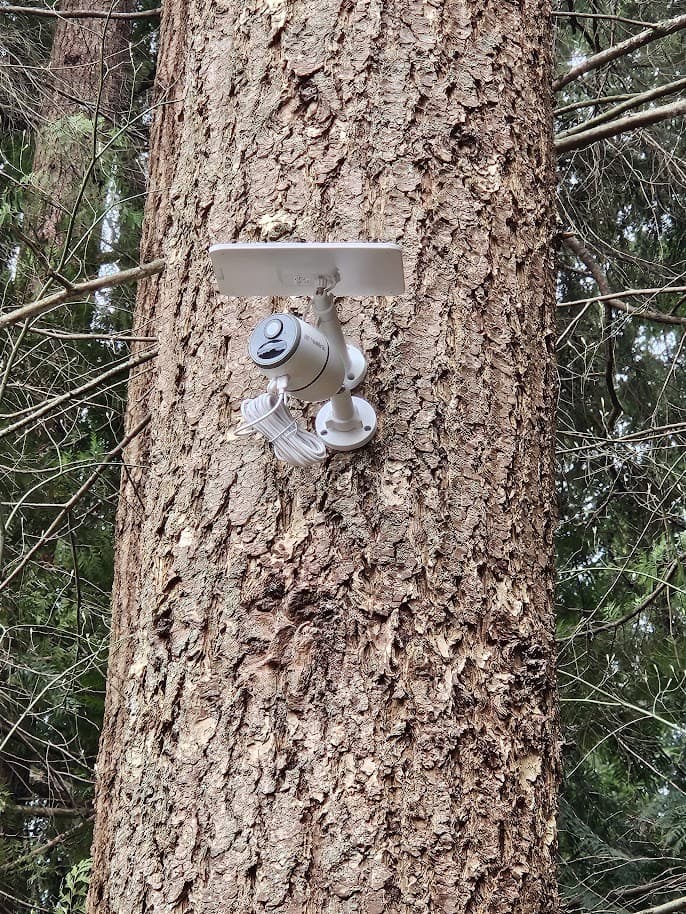
2. Cellular connection
The camera ships with a Reolink SIM card that you activate directly through the Reolink app. I went with their $6/month 1GB plan - more than enough for time-lapse mode, which stores footage locally on the SD card and only uses cellular for remote check-ins.
Activation was painless: insert the SIM, scan the QR code in the app, pick a plan, done. No third-party carrier portal, no separate billing account, no hunting down a data-only SIM that activates cleanly. Reolink's plans are tied to the camera's serial number and managed inside the same app you use to view footage.
3. Time-lapse configuration
In the Reolink app, I configured the time-lapse settings:
- Capture interval: 1 photo every 30 seconds during daylight hours (6 AM – 8 PM)
- Resolution: 4K (3840×2160)
- Storage: 128GB microSD card inserted in the camera
The camera compiles the photos into a time-lapse video file directly on the SD card. No post-processing required unless you want to get fancy with it.
4. Power
This was my biggest concern going in. We're in the Pacific Northwest - not exactly known for sunshine. From October through February, we get weeks of solid overcast skies and short days. I fully expected to be swapping batteries by hand through the winter.
It never happened. The 6W solar panel kept the battery topped off through the entire year. Even during the darkest stretches of December and January - multiple weeks of heavy cloud cover and rain - the battery never dropped below 50%. The panel doesn't need direct sunlight to charge; ambient daylight is enough. I checked the battery level weekly through the app and never once had to intervene.
12 months later: the results
The camera ran for the full 12-month build without a single failure. Here's what the experience was actually like:
Image quality
The 4K footage is genuinely sharp. You can see individual workers, equipment markings, and material deliveries clearly. It's not cinema-grade, but for a construction time-lapse destined for LinkedIn and client presentations, it's more than sufficient. Nobody watching your 60-second recap is pixel-peeping.
Reliability
This is where I was most impressed. The Pacific Northwest is not a gentle climate for outdoor electronics. The camera survived:
- Months of rain - the PNW kind, not a passing shower. Sustained weeks of drizzle, downpours, and wind-driven rain
- Freezing temperatures - multiple sub-freezing stretches through winter
- Summer heat - 90°F+ days with direct sun on the camera body
- Construction dust and debris - a year of dirt, concrete dust, and nearby heavy equipment vibration
Zero downtime. Zero SD card corruption. Zero manual intervention after the initial setup. Mounted on a fence next to an active construction site for 12 months and it just kept running.
Data usage
With time-lapse mode running locally and only using cellular for my occasional live check-ins, I stayed comfortably under 1GB per month. The $6 Reolink plan with 1GB was the right fit - no need to pay for data I wasn't using.
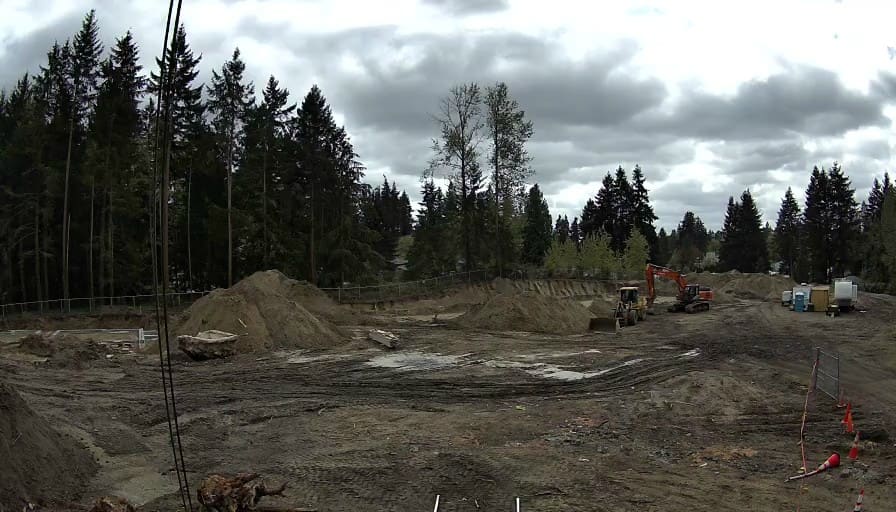
Sample footage
Here's a short clip of the raw time-lapse footage straight off the SD card - no editing, no color grading, just what the camera produces out of the box:
The camera compiles the time-lapse directly on the SD card. When the project wrapped, I pulled the card, dropped the footage into DaVinci Resolve (free), added a title card and music, and had a polished 90-second video ready for the client in under an hour.
Update: two-camera setup on our current build
The first project went well enough that we doubled up on the next one. Two Reolink Go Ultras on a residential build we just broke ground on, covering opposite corners of the site so we get both the wide approach shot and a tight angle on the foundation work.
Here are two sample frames pulled from the current project, one from each camera:

Two cameras, two Reolink SIMs, same setup as before. About $400 in hardware plus $12/month in data, versus the $7,500+ for a single pro position.
Where the pros still win
I want to be honest about the tradeoffs:
- Multiple angles: EarthCam and BuildCam can set up 3–5 camera positions with a single contract. If you need multiple angles, you're buying multiple Reolink cameras (still cheaper, but more setup work).
- Live streaming: The pro services offer embeddable live streams for your website. The Reolink does live view through the app, but it's not designed for public-facing streams.
- White-glove editing: You get a professionally produced final video with branded graphics. My DIY version required 45 minutes in DaVinci Resolve.
- Contractual accountability: If an EarthCam camera fails, it's their problem. If your Reolink fails, it's yours. (Mine didn't, but it's worth noting.)
For mega-projects with investor oversight and multi-million-dollar budgets, the pro services make sense. For everything else - and that's most of us - the DIY route delivers 90% of the result at 3% of the cost.
Why this camera specifically
I tested this against two other options before committing:
- Wyze Cam v3: Great price, but requires WiFi. Non-starter for a construction site without power or internet.
- Trail cameras: Cheap and cellular-capable, but most top out at 1080p and don't have configurable time-lapse intervals. The footage looked muddy.
The Reolink Go Ultra hits the sweet spot: 4K resolution, cellular connectivity, solar power, and a time-lapse mode that actually works as advertised. It's also a fully functional security camera, so it pulled double duty monitoring the site after hours.
Step-by-step if you want to replicate this
- Buy the camera - Get the bundle with the solar panel. You need it for a year-long deployment.
- Activate the included Reolink SIM - Insert the SIM that ships in the box, open the Reolink app, and pick the $6/month 1GB plan. One QR scan and you're online. No third-party carrier needed.
- Insert the microSD card - Twist the rear panel counterclockwise to access the slot. Use a 128GB card minimum.
- Mount it on the perimeter fence with a clear sightline - Face it toward the full footprint. Fence-mounting works great and keeps setup simple.
- Configure time-lapse in the Reolink app - Set your interval (30 seconds is a good starting point), restrict to daylight hours to save storage, and set resolution to 4K.
- Check in monthly - Glance at battery level and storage remaining through the app. That's it.
- Pull the SD card when the project wraps - Drop the footage into any video editor for a title card and music.
Bottom line
Professional construction time-lapse is a solved problem. It's also an expensive one. If your project budget doesn't include $6,000+ for a camera vendor, a $200 Reolink on a $6/month Reolink SIM plan gets you to the same finish line.
Ours ran for 12 months on a fence in the Pacific Northwest - survived a full year of rain, freezing temps, and construction chaos, stayed charged on solar despite the PNW's legendary lack of sunshine - and produced a clean 4K time-lapse that the client loved. Total spend: about $300.
Sometimes the boring, practical answer is the right one.
We take the same "practical over premium" approach to all our IT decisions. If you're managing remote employees, take a look at the WFH workstation stack we ship to every new hire or how we back up Microsoft 365 with a $1,000 Synology NAS.
Related reading
Guides
How a $1,000 Synology NAS Completed Our Microsoft 365 Backup Strategy
Cloud backup alone isn't a backup strategy. We added a Synology DS225+ with Active Backup for fast on-site M365 recovery - no licensing fees, no monthly costs, ~$1,000 total.
Guides
The WFH Workstation We Ship to Every Remote Employee (Under $600)
Our standardized work-from-home setup ships directly from Amazon to any employee's doorstep. Dual monitors, dock, webcam, headset, keyboard, and mouse for under $600 per seat.
Guides
The Microsoft 365 Security Floor Every SMB Should Hit in 2026
Three layers separate a hardened SMB Microsoft 365 tenant from a soft one: Microsoft-managed Conditional Access, phishing-resistant MFA, and Intune device compliance. Here is why that floor matters and what each layer actually does.